Subscribe To This Site


|
Pastry RecipesThese fantastic pastry recipes will ensure you look and feel like a professional cook. Okay - so I know that pre-made pastry can be bought in the store - but truly, there is nothing like the accomplisment you feel when you make your own. Hopefully these old pastry recipes I will include, will alleviate some of the panic and anxiety you may have previously felt before attempting your own. I know that once upon a time, I myself would start to hyperventilate at the mere thought, but as I worked through these recipes, I realized that all of my fears were quite unfounded. Since I started making my own pasty, I have received so many compliments that I know that nothing matches the taste of home-made pastry - so give them a go, and let me know how you went. So make this page - Pastry Recipes - a favorite in your browser: I know that you will grow to love them as much as I do.
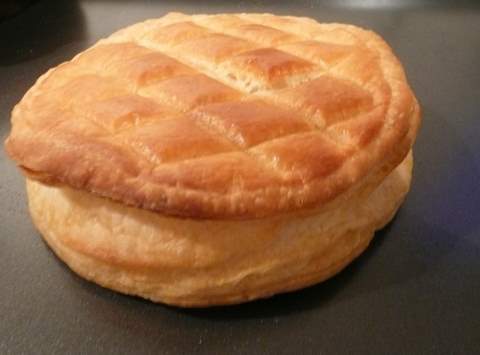
Some General Tips - Puff PastryFor perfect pastry which rises evenly, the edges must be cut cleanly with a sharp knife or cutter, not torn. Egg glazes give a shine but must be applied carefully - any drips down the side may glue the layers together and stop them rising correctly. The pastry should be chilled for at least 30 minutes before baking to relax it. Always bake puff pastry at a very high temperature - it should rise evenly so, if your oven has areas of uneven heat, turn the pastry around when it has set. If you have an oven with a bottom element, cook your pastry on the bottom shelf. When puff pastry is cooked, the top and the base should be browned, with only a small amount of underbaked dough inside, and the layers should be visible. Puff pastry is not always perfect - it may fall over or not rise to quite the heights you had imagined - but provided you don't burn it and it is well cooked it will still be delicious. To make sure you get a well-cooked base on pastry, put a baking tray on the shelf of the oven when you preheat the oven and put the baking tray with the pastry on it straight on top of this. Some General Tips - Shoftcrust PastryThe secret of good pastry is to work quickly and lightly, with cool ingredients, in a cool room and preferably, not on a hot day. A cold marble slab is the ideal work surface. If you don't have a marble slab, rest a tray of iced water on the work surface for a while before you start. Use real unsalted butter for pastry, not margarine or softened butter blends. Unsweetened pastry works well with sweet fillings, giving a good contrast of flavours. Add two tablespoons of caster sugar to the flour for a sweet pastry. Some recipes contain egg yolks to enrich the pastry and give good colour. Decorative Beauty Tips for your Pastry:Decorative Crust Edges:
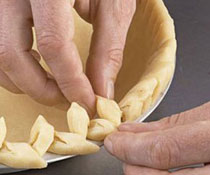
Traditionally, only savoury pies were decorated, to distinguish them at a glance from sweet pies. Today we are unlikely to bake more than one pie in a day, so confusion shouldn't be a problem. Pies are usually double crusted (with a pastry base and top) or just crusted on the top, whereas tarts are generally open with no pastry on top. Pies or tarts that are made in pie dishes with a lip can all be decorated around the edge. As well as making pies look attractive, decorating can be practical - it seals the edges of a double crusted pie, uses up pastry trimmings and helps identify the filling of your pie. Fork pressed - press a lightly floured fork around the edge of the pie crust. Fluted - press the pastry edge between your thumbs at a slight angle, to create a ripple effect. Crimped - press the pastry between thumb and forefinger, while indenting with the other forefinger. Scalloped - mark or cut out semi-circles with a spoon. Checkerboard - make cuts in the pastry edge. Turn every other square inward. Leaves - cut out leaf shapes with a cutter or template and place over the lip of the pie, fixing with water or egg glaze. Plait - cut three long strips and plait them to the length of the circumference of the tart. Brush the pastry edge with a little water and press gently into place. Rope - twist two long sausages of pastry together and attach to the edge with water. Feathering - lift the pastry off the lip so it stands upright and snip diagonally into the edge of the pie. Push one point inwards and one outwards. Decorative Tops:
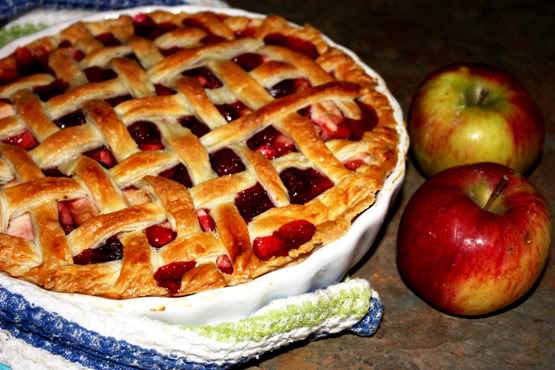
When decorating with pastry trimmings, don't make the shapes too thick or they won't cook through. Re-roll the leftover pastry to an even thickness and cut out shapes with small cutters (some of these are found at cake-decorating stores). If you want to make a shape you don't have a cutter for, draw it on a piece of stiff card and cut out to make a template. The shapes can indicate the pie filling, such as cherries or apples, or be purely whimsical, such as hearts or stars. Attach the shapes to the pastry top with the glaze (often egg white, thought for a rich colour, you might use a lightly beaten egg), then glaze them as well. You can place pastry shapes onto an open tart or around the edge. If the filling is quite liquid, cook the shapes separately and arrange on the middle of the tart after is is baked and the filling has set. If your tart cooks for a long time, check that the edges are not over-browning and cover with pieces of foil if necessary. Lattice Top: A lattice makes a very impressive top for a pie, and is actually quite easy to make. On a sheet of baking paper, roll the pastry out to a square or rectangle a little larger than the pie (just as you would to cover normally). Using a fluted pastry wheel, or a small, sharp knife, cut strips of pastry about 1.4cm wide. Use a ruler to make perfect straight lines. Lay half the strips on another sheet of baking paper, all in the same direction, and about 1 cm apart. Fold altrnate strips of pastry back away from you (all the way back to start with. Lay a strip of pastry horizontally across the unfolded strips, then fold them back into place. Fold the lower strips back this time, and lay another strip of pastry across. Repeat with all the strips, alternating the vertical strips. If the pastry is very soft, refrigerate it until firm. Invert the lattice onto the pie and peel the paper away. press the edges to seal and trim off the excess pastry. Alternatively, make life easy for yourself and buy a special lattice cutter, then simply roll out your pastry and roll over it once with your cutter, gently open the lattice out and lift it onto your pie and then trim the edges. So...onto the recipes.....Puff Pastry
To Choux Pastry Recipes from Pastry Recipes . This page will prove to you that whatever you are passionate about, is worth writing about - because the odds are high that many others "out there" want to know what you know. Afterall - you're visiting my website, right? So you're interested in the information I'm sharing. Read about how I created my website, and be inspired... Joining the Solo Build It community is like adopting a whole pile of good friends - everyone is so helpful and positive - and with the same goals in mind: to be financially better off, and to have more time to enjoy their lives. Let me know how you go, and if you have any questions, please send them through to: joanne@aussie-true-blue-recipes.com
|