|
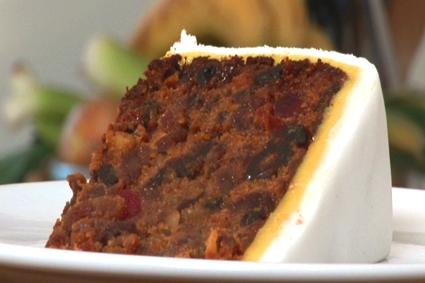
Fruit Cake(suitable for Wedding and Celebration Cakes)
Ingredients:If you are making this fruit cake for a wedding or celebration, it can be made up to six months before the wedding if desired, provided that they are stored correctly. The cake can be completely decorated up to two days before the wedding. Although you can purchase Cake Boards already covered with either silver or gold paper, you can also finish the Cake Board yourself. It is much easier to completely match the cake if you elect to cover the board yourself. It is correct that the following recipe does NOT include self-raising flour, or any other raising agent. Enough of the chit-chat, on with the recipe. 1¼ kg sultanas 500g raisins 250g currants 250g mixed peel 250g glace cherries, quartered 1/3 cup marmalade 1 cup rum, brandy, whisky or sherry 500g butter 2 teaspoons grated orange rind 2 teaspoons grated lemon rind 2 cups brown sugar, firmly packed 8 eggs 4 cups plain flour 1/3 cup rum, brandy, whisky or sherry, extra 2 teaspoons mixed spice parisienne essence 1/3 cup copha (melted for lining tins) 2 tablespoons flour, extra To prepare tins:Line the base and sides of 2 deep 25cm and 15cm square (or deep 28cm and 18cm round) cake tins with 3 sheets of baking paper. The paper should extend 5cm above the edges of the tins to protect the surface of the cakes during the long cooking time. Try to make the paper fit as neatly as possible, so that your mixture can get right into the corners neatly. Any gaps or dints caused by excess paper will make your job harder when it comes time to ice the cake. Place copha in a coffee mug or small glass bowl, and melt in the microwave until it has completely liquified. Using a pastry brush, quickly paint the insides of the tin (over the baking paper) generously. This will allow your cake to be "sealed" as well as making it very easy to remove the baking paper once the cake has been turned out. If desired, take the 2 tablespoons of extra flour and coat the inside of the tins, over the copha. Shake excess into the bin. Method:Before starting, ensure that the butter and eggs are at room temperature. Combine all fruit, marmalade and rum in large bowl and mix well. Leave fruit to soak up the alcohol, as this adds not only to the preservation but also the lovely rich flavour of this cake. Cream butter and rinds in large bowl with electric mixer until just smooth. Add sugar and beat until just combined. Add eggs one at a time, beat only until ingredients are combined between additions. The faster the eggs are added, the less likely the mixture is to curdle. Add creamed mixture to fruit mixture, mix with wooden spoon or your hand (note, this mixture is extremely heavy to mix, so I highly recommend getting right in their with a good clean hand). Mix in sifted dry ingredients thoroughly. At this stage, add the parisienne essence if desired. This is entirely optional - the parisienne essence can be quite bitter if too much is added, however adding a few drops to a teaspoon will make the cake a lovely dark and rich colour. If a light fruit cake is preferred, simply leave it out. Divide mixture between prepared tins, level mixture as evenly as possible. Make the depth of the cake misture in the smaller tin 5mm less than the depth of the cake mixture in the larger tin. The smaller cake will expand slightly more than the larger cake during cooking. When they are cooked they should be about the same depth - this minimises trimming the cake. Bake cakes in a slow oven (120°C), the smaller cake 2 to 2½ hours, the larger cake 3 to 3½ hours. Cakes can be baked on the same shelf of the oven provided tins do not touch each other, the walls of the oven or the door when it is closed. Cakes can also be baked on 2 shelf positions, simply change positions of the cakes halfway through the cooking time of the smaller cake. If it is inconvenient to cook cakes after they are mixed, they can be kept covered in the refrigerator for up to 4 weeks. Allow cakes to return to room temperature before baking to simplify estimating cooking time. Cold cakes will take longer to cook. To test if cakes are cooked, first touch the surface of the centre of the cake with fingertips after minimum given cooking time. If cake feels firm, then use a sharp pointed knife - a vegetable knife is ideal - and push the knife gently right through the centre of the cake, down to the base of the tin. Withdraw the knife gently, feel the blade: it should not feel sticky and should be free of cake mixture. The smaller cake will be lighter in colour then the larger cake - it is the longer cooking time that darkens the cake. Also, the cakes will darken more as they cool. Tear away any lining paper above the edges of the tins, brush the top of the cakes evenly with the extra alcohol (be generous). Cover the top of the tins tightly with aluminium foil, then invert tins onto a bench. The cakes will fall out of the tins and flatten as they cool. This also minimises trimming or levelling the cakes prior to icing. Cover the tins with a towel to slow down the cooling time. Next day, remove the cold cakes from the tins, leave the lining paper intact on the cakes. Wrap the cakes tightly in plastic food wrap, then wrap in foil or teatowels. Store in cool dark place for up to 6 months, if desired. If weather is wet or humid, store cakes in refrigerator. Cakes can be frozen for up to 6 months but there is little point, they will keep perfectly in the refrigerator or at a cool room temperature. Please see my video below, as I make this cake.
Fruit Cake - Video Demonstration
Icing The Cake
|