|
Icing The CakeThis page will describe in step-by-step detail the way to correctly cover a cake with Plastic Icing, which is also referred to as Fondant or Pettinice. For the purpose of this demonstration, I'm going to assume you have a Fruit Cake cooked. Suffice to say - you can cover ANY cake with fondant, but it is really only the Fruit Cake that will experience "holes" due to the consistency of the mixture itself.
Centering the Un-Iced Cake on the BoardIf you plan on flooding your Board, you will need to ice your cake on the Cake Board first. If you plan to cover your Board with either paper, fabric or Plastic Icing - you should prepare your Board first. When you are ready to affix your Cake to the Board, temporarily cover it with a layer of plastic (such as a shopping bag)and stick the plastic to the board in the centre with a blob of royal icing (about a tablespoon). You will be cutting away excess Plastic, but the layer will remain between the cake itself and the board. This plastic layer is there for various reasons. First, to protect your board while you ice the cake. Second, to place a barrier between your cake and the board, to prevent any leakage from the cake to the board. Third, to prevent any contamination from the board, the paper, the fabric or any other non-edible product. Place another blob of royal icing in the centre and on top of the plastic layer, and centre your cake on the board. Until you are experienced at centering your cake, use a ruler or tape measure to ensure that the cake is dead centre on the board.
Filling the Gaps
Because of the consistency of fruit cake mixture, almost every cake has a little filling to do. Even patching the base to ensure the cake is level is almost always necessary. It is imperative that you do this step, otherwise your finished cake will look "dappled" - I call this the cellulite effect, which we all like to avoid at any cost. Have some softened copha on hand, and some kneaded (smooth and elastic) plastic icing. Roll small parts of your fondant into a "sausage" and using your spatula, work around the cake filling the holes. Try to ensure that you don't over-fill the holes, and then create a bump of icing. I use the copha on the end of the spatula to smooth the icing more easily, but if you can do this without using copha, all the better.
Preparing the Cake for Covering With Fondant
Covering The CakeWhen you have filled all the gaps (don't forget around the base of the cake), move it right out of the way so you can totally clean up your work surface. The last thing you want is cake crumbs in your icing - it can totally wreck your day (well, mine anyway). Remove your wrist and finger jewellery Once your work surface is totally clean, dust the surface with some sieved icing sugar (I have a icing sugar specific sieve). Knead your plastic icing until it is smooth, pliable and elastic. Sometimes a very quick stint in the microwave (5 seconds at a time) will assist this process, especially in winter or very cold climates. Flatten out into a large round with the palms of your hands, and then commence rolling, constantly lifting and turning the icing to prevent sticking to your work surface. Add more sifted icing sugar if needed. Roll the icing sugar to approximately 10mm thickness (this will thin significantly once you are working the icing to the cake).
Cut away the excess, and repeat the process with the smoother on the side of the cake - though don't press as firmly this time. Use the smoother in a circular motion o the top of the cake - being careful to avoid the edge of the cake itself. When the top is nicely smooth and even, curl your fingers over the edge of the cake - and using very little pressure, skim around the edge with the inside curl of your fingers (this is really hard to explain - am I making sense?). You should be able to feel the icing behind your finger's middle knuckles. You will notice that the edge becomes nicely smooth, and the whole cake should have no dents, creases, stretch marks.
Covering The Cake With Fondant
StorageAllow your cake to dry. I usually place it on the top shelf of my pantry for a couple of days. If you wish, you can place the cake in a very large box, and cover the top in either plastic wrap or a towel to keep the dust out. I'm quite lucky where I live in that there is no need to fear things like ants or dust - but you do whatever you feel you must to keep the surface of the cake dust and insect free while your icing is drying.
Back to Cake Decorating from Icing The Cake
|
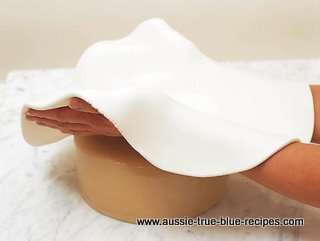 Spray the surface of your cake with either water, brandy or dark rum and then carefully lift your icing on the cake in one smooth action.
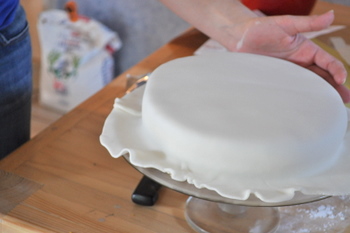 Work Quickly to pat the icing to the sides of the cake, lifting and smoothing as you go to avoid creases. If you don't do this immediately, the icing may stretch from the top of the cake and holes or stretch marks may result.
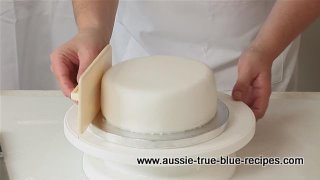 Using your smoother, work around the side of the cake, pressing a little inwards and downwards. You will notice that the side of the cake will become nicely smooth, and you will have more excess icing at the base of the cake.
